Person-Specific Deepfakes with 3D Morphable Models
Originally published on Medium.
While person-generic models such as Wav2Lip are incredibly versatile and work out of the box with any face and any audio, they still lack…
Person-Specific Deepfakes with 3D Morphable Models
While person-generic models such as Wav2Lip are incredibly versatile and work out of the box with any face and any audio, they still lack quality. In this article, we are going to look at one of the most popular methods for creating person-specific models. That is, using a 3D Morphable Model (3DMM), with neural rendering.
3DMMs are central to a lot of person-specific deepfake models. For example, this paper, this one, this one, or this one, to name a few. I also expect that most commercially successful deep fake companies (e.g. Synthesia, DeepReel, Flawless AI) make heavy use of 3DMMs. Look out for 3D meshes overlayed on faces in their demos, this is usually a sign of using this method, not just a marketing gimmick.
The 3DMM
3D Morphable Models are a very old (1997 that’s as old as me!) computer graphics technique for representing the geometry of the human face. They are built using a collection of 3D scans of the head and act as a statistical model. I’ll go into more detail about how these actually work in a future post, but it is enough to know for now that they have a small set of parameters that control:
- The shape of the face with a neutral expression. This is the difference between my head at rest and yours.
- The expression on the face. This is independent of the shape. The set of parameters for my smile should make a smile on your face.
- Thecolorof the face. Sometimes also called appearance or texture.
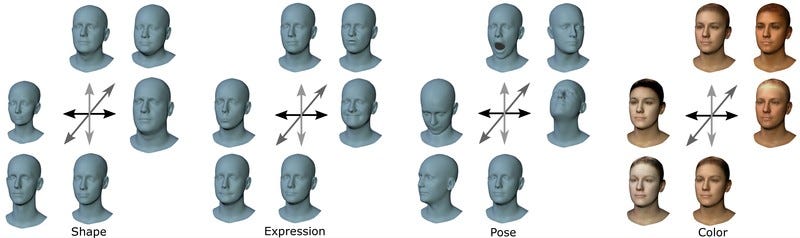
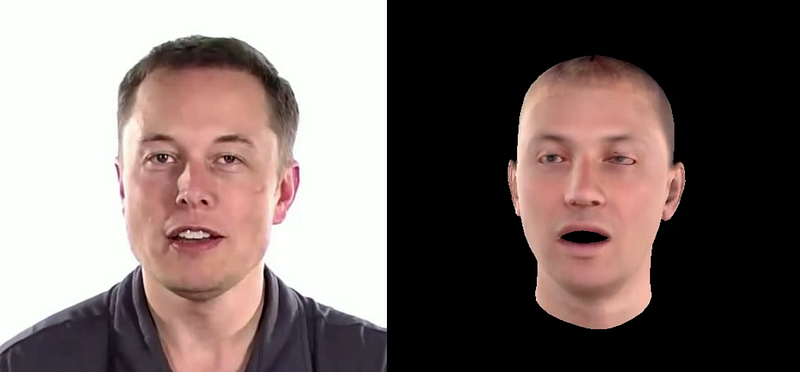
Additional parameters such as the neck pose (above) are sometimes also modeled, but they are not essential. By varying these parameters, it is possible to produce a 3D mesh that looks sort of like any face or head. For example, here’s a really basic reconstruction of Elon we used for the video:
Ok, so what? We’re interested in producing 2D videos of people, not 3D models that kind of look a bit like them! Why would we want to use a 3DMM? The answer to this is, in my opinion twofold. For one, the 3DMM is built on real 3D scans. Using single-camera 2D video it is impossible to actually infer the 3D geometry because of depth ambiguities. There’s a reason we have 2 eyes! As the 3DMM is built on 3D scans, it provides powerful prior information, which allows us to use much better estimates of the geometry than would be possible from 2D alone.
The other reason is that the 3DMM acts as a sort of low-dimensional latent representation of a person’s face. This is much easier to manipulate than pixels. Let’s say we wanted to generate a video at 512 by 512 resolution. A medium-res video. This would have just shy of 800,000 dimensions to consider. Trying to use audio to generate this is essentially impossible. On the other hand, using audio to drive somewhere in the region of 100 3DMM parameters for expression is pretty straightforward.
Tracking
Given a 3DMM, the first thing we need to do is fit it to real video. In addition to the 3DMM parameters, we also usually consider additional parameters for the pose (position and orientation of the head), the lighting, and the camera. Taking all of these parameters together, the general idea is to find a set of parameters that best matches a given frame. This is usually done using a technique called differentiable rendering.
Differentiable rendering allows gradients to be backpropagated through the rendering process meaning that losses can be applied at the image level. A super simple tracker works by computing the difference between the real image and the rendered 3DMM at the image level, then optimizing the above set of parameters to get the best match. In practice, this is not enough, and additional losses are required. In particular, landmark losses are used as a way of getting the mesh “close enough” to the real face.
An important part of the tracking process is that the shape, texture, and camera parameters (and sometimes light) are fixed across a given video, meaning only expression and pose need to be calculated per frame and hence estimated from audio later on. This even further reduces the complexity of the problem.
If you want to have a go at this sort of tracking, there are some great codebases. In my opinion, the best of these at the moment is from the MICA codebase. I would suggest using something like this as a basis if you wanted to attempt a full pipeline.
Neural Rendering
The next question is: how do we invert the fitting process, to get realistic-looking video from these low-quality renderings? The answer to this is, of course, to throw deep learning at it! Fortunately, we have the advantage to make this easier, paired data. Every frame that we have tracked gives us a pair of a rendered mesh frame and a real frame. We just have to train a model to convert one to the other.
A basic way of doing this would be to use a UNET-style model and train the model using regression losses. However, in practice, this is not enough to produce super-realistic frames. We typically use some form of generative model to fill in this gap. In the existing literature, this is usually a GAN. A more sophisticated way exists in the form of neural textures, where a more detailed and abstract texture can be learned together with a UNET that can interpret it.I would suggest reading this paper.
I think there is still some room for research in this direction, for example using diffusion models or a VQ-GAN style approach for the neural rendering, but this remains an open question.
Audio-to-Expression
The final step in the pipeline is to control the expressions of the 3DMM using audio. As mentioned before this is a simple task compared to trying to predict pixels. Early models use an approach like VOCA which simply attempts to predict parameters from audio features using regression. More advanced transformer-based models, such as Imitator (below) have helped move the quality up significantly.
With these models, the inference pipeline is basically the following:
- Take a new audio you want the character to say.
- Convert it into expressions using the audio-to-expression model.
- Take the shape, texture, pose, and lighting from a section of the tracked video.
- Render it into a low-quality mesh video.
- Use neural rendering to convert it to photo-realistic video.
Conclusion
Throughout this article, I’ve tried to stay as general about the pipeline as possible. I’ve not covered any specific papers in detail and for that reason, the actual process behind each of these steps is lacking. I will cover individual papers and specific methods for each step in the future, but this article is meant to serve as a reference, showing how these popular person-specific models usually work.
This method is very popular, and the results are insanely good. I hope this article can go some way toward explaining the basics of how these models work. Please let me know if there’s any specific part of this pipeline you want covered in the future, or if you have any suggestions!
By Dr Jack Saunders on May 11, 2023.
Exported from Medium on March 18, 2026.